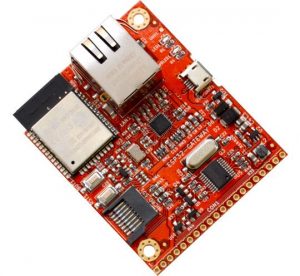
I recently bought some stuff from a company called Olimex. One of the things bought was a ESP32 based gateway development board. This board have have been tested for the first time and the result and some basic instructions are provided in this blog post.
This board is based around a ESP32-WROOM32 module from Espressif. This means that the board have WiFi and Bluetooth connectivity. Some additional things that comes on this board is an Ethernet interface and a MicroSD card reader.
Board Programming Instructions
The ESP32 chip can be programmed and I have tested the board by uploading a test program that blinks a LED that is mounted on the board.
There is some setup that must be done on the computer that shall be used to develop and program the ESP32. This post does not cover this basic setup but instructions for what is needed and how to install things are described in the ESP-IDF Programming Guide.
There are ready made examples in the ESP32 API called ESP-IDF.
The following steps are needed to get a LED on the gateway development board to blink using a Linux computer. Open a terminal and go to the location of the ESP-IDF that you should have downloaded according to the instructions linked to above. What we want this time is the blink example in the getting started folder. In my case so is this located at:
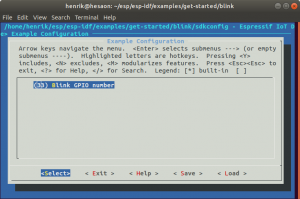
henrik@hesaon:~/esp/esp-idf/examples/get-started/blink$ When in this location so shall the command make menuconfig be run:
henrik@hesaon:~/esp/esp-idf/examples/get-started/blink$ make menuconfigThis starts a project configuration program where the GPIO pin of the LED can be set. The documentation of the development board can be found here. And checking the schematics reveals that there is a LED on the board connected to GPIO pin number 33. So lets setup to use this pin in the configuration program and then hit save followed by exit.
Connect the kit to the computer by the use of an USB cable and type make flash to build and transfer the program to the development board.
henrik@hesaon:~/esp/esp-idf/examples/get-started/blink$ make flash
Expected result is that a green LED next to the Ethernet port starts to blink.
Conclusion
Everything have gone very smooth with this board so far. Olimex was very fast at sending the board and had good documentation to get this first blink test running without really encountering any problems at all.
The plan for this board is now to connect it to a temperature sensor and have the temperature published online by the use of the board network interface. This will be presented in a future upcoming blog post.
Thanks for your blog, nice to read. Do not stop.